Showtime Rotisserie Manual: A Comprehensive Guide
Welcome! This manual details the Ronco Showtime Rotisserie, covering setup, operation, cooking, cleaning, troubleshooting, and parts for models 3000-6000.
The Ronco Showtime Rotisserie represents a legacy of convenient and flavorful cooking, evolving from its original invention to modern editions. This appliance isn’t just for chicken; the multipurpose basket expands culinary possibilities to fish, vegetables, and more.
This manual serves as a comprehensive guide for owners of Series 3000, 4000, 5000, and 6000 models. It details everything from unboxing and assembly to advanced cooking techniques. Expect simple controls, auto shutoff features, and easy cleanup with dishwasher-safe components.
Prepare to rediscover the joy of rotisserie cooking with this user-friendly and versatile kitchen appliance, designed for both novice and experienced cooks.
Understanding Your Model: Series 3000, 4000, 5000 & 6000
Ronco Showtime Rotisserie models – 3000, 4000, 5000, and 6000 – share core functionality but may exhibit slight variations in capacity and features. All series utilize a rotating spit for even cooking, and benefit from the included multipurpose basket for diverse meal preparation.
The 4000 and 5000 series are commonly found as replacement parts are readily available, including drip pans and spit rod assemblies. Modern editions boast simple switch controls and a silicone door tie for secure storage. Refer to your specific model’s documentation for detailed specifications.
This manual covers commonalities across all series, ensuring a broadly applicable guide to operation and maintenance.
Key Features and Benefits
The Ronco Showtime Rotisserie offers a convenient, hands-off cooking experience. Its key benefit is the ability to roast more than just chicken; the multipurpose basket expands culinary possibilities to include fish, vegetables, and even hamburgers.
Modern editions feature auto shutoff for safety and simple switch controls for ease of use. Cleanup is streamlined with dishwasher-safe components like the glass door and drip pan. The silicone door tie ensures secure storage.
Enjoy deliciously roasted foods with minimal effort, thanks to the rotisserie’s consistent, even cooking.

Setting Up Your Rotisserie
Prepare for delicious meals! This section guides you through unboxing, assembly, and initial testing to ensure safe and optimal performance.
Unboxing and Parts List Verification
Carefully unpack your Ronco Showtime Rotisserie and verify all components are present. Refer to the included parts list – typically detailing the glass door, rotisserie spit rod assembly, non-stick basket, drip pan with grate, carving platform, and food ties.
Inspect each item for any shipping damage. The manual (available online at ManualsLib) highlights key parts like the gear wheel and spit rods. Ensure you have the DVD with instructions. Missing parts? Contact the retailer immediately. A complete inventory ensures a smooth setup and enjoyable cooking experience. Don’t discard packaging until verification is complete!
Assembly Instructions: Step-by-Step Guide
Begin by attaching the spit rod assembly to the rotisserie, ensuring a secure fit. Next, position the drip pan and grate within the oven’s base. Carefully install the glass door, utilizing the silicone door tie (found in modern editions) for added security during storage;
Refer to the DVD or the Ronco Showtime 3000 Series instructions (ManualsLib) for detailed diagrams. Properly aligning components is crucial. Double-check all connections before proceeding. The non-stick basket and carving platform can be added later. A correctly assembled unit guarantees safe and efficient operation.
Initial Testing and Safety Checks
Before first use, thoroughly inspect the assembled rotisserie for any damage. Power on the unit and verify the spit rotates smoothly. Confirm the temperature controls function as expected, observing the heating element. Ensure the auto shutoff feature engages correctly.
Crucially, review all safety warnings detailed in the manual. Never operate the rotisserie near flammable materials. Always use oven mitts when handling hot components. Proper electrical safety is paramount; ensure the unit is grounded. A pre-use check guarantees a safe cooking experience.

Operating Instructions
Get started! Power on, select your desired temperature, and load the spit. Enjoy hands-off cooking with the Ronco Showtime Rotisserie’s simple controls.
Powering On and Basic Controls
Initiating Operation: Begin by plugging the Ronco Showtime Rotisserie into a grounded electrical outlet. The unit features simple switch controls for ease of use. Locate the power switch, typically found on the front panel, and toggle it to the ‘On’ position.
Control Functions: The rotisserie primarily operates with temperature and timer settings. Adjust the temperature dial to your desired cooking level, referencing recipe guidelines. The rotisserie will automatically shut off when the timer expires, ensuring safe operation.
Spit Rotation: Once powered on, the spit will begin to rotate, providing even cooking. Observe the rotation to confirm proper functionality. The silicone door tie secures the door during operation and storage.
Temperature Settings and Cooking Times
Temperature Guidance: The Ronco Showtime Rotisserie offers variable temperature settings. For poultry, a moderate temperature (around 350°F/175°C) is recommended. Adjust based on the size of the bird. For vegetables or smaller items using the multipurpose basket, lower temperatures (300°F/150°C) are suitable.
Cooking Duration: Chicken typically requires 90-120 minutes, depending on weight. Always use a meat thermometer to ensure internal temperature reaches 165°F (74°C). Cooking times for other foods vary; consult recipes for optimal results.
Monitoring & Adjustment: Regularly check the food’s progress and adjust temperature or cooking time as needed for desired doneness.
Using the Rotisserie Spit
Spit Rod Assembly: Carefully assemble the non-stick spit rod, ensuring secure attachment of the forks. Center the food on the spit, using the provided food ties to firmly secure it in place. Proper balancing is crucial for even cooking; adjust food position as needed.
Loading & Securing: Slide the assembled spit into the rotisserie oven, aligning it with the motor drive. Ensure the spit rotates freely without obstruction. The silicone door tie can help secure the door during operation.
Safety First: Always handle the hot spit with oven mitts.

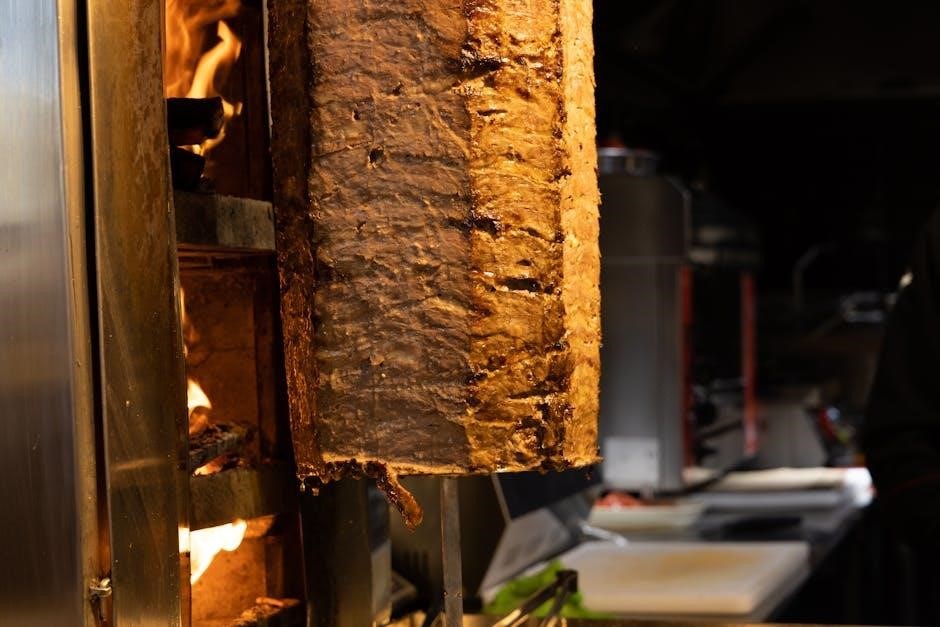
Cooking with the Showtime Rotisserie
Delicious Results! Explore recipes beyond chicken, utilizing the multipurpose basket for fish, vegetables, and more, enjoying hands-off, flavorful cooking.
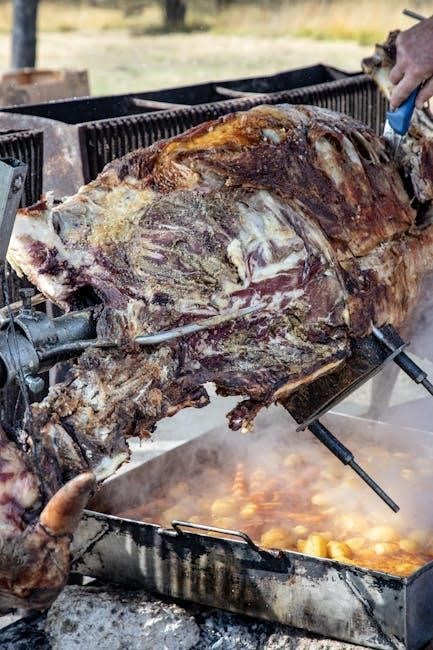
Roasting Chicken: A Detailed Recipe
Preparing for Perfection: Begin by thoroughly rinsing a 3-4 pound chicken, inside and out. Pat it completely dry with paper towels. Season generously, both under the skin and externally, with your favorite blend of herbs and spices – paprika, garlic powder, and onion powder are excellent choices.
Spitting and Securing: Carefully thread the chicken onto the rotisserie spit, ensuring it’s balanced. Secure it tightly with the provided food ties, preventing wobbling during rotation.
Cooking Time & Temperature: Place the spit into the Showtime Rotisserie. Set the temperature to 375°F (190°C) and cook for approximately 90-120 minutes, or until the internal temperature reaches 165°F (74°C) in the thickest part of the thigh. Basting occasionally with pan drippings enhances flavor and moisture.
Beyond Chicken: Versatile Cooking Options
Expand Your Culinary Horizons: The Ronco Showtime Rotisserie isn’t limited to poultry! Utilize the multi-purpose basket for roasting vegetables like potatoes, carrots, and Brussels sprouts to caramelized perfection.
Seafood Sensations: Fish fillets, seasoned with lemon and herbs, cook beautifully in the basket, remaining moist and flaky. Hamburgers and sausages also benefit from the hands-off, even cooking provided by the rotisserie action.
Experiment with Flavor: Explore marinades and rubs to infuse different cuisines into your meals. Remember to adjust cooking times based on the food type and quantity for optimal results.
Utilizing the Multi-Purpose Basket
Versatility at Your Fingertips: The included multi-purpose basket dramatically expands the Ronco Showtime Rotisserie’s capabilities beyond just roasting a chicken. This basket allows for hands-off cooking of various foods, ensuring even heat distribution and delicious results.
Perfect for Smaller Items: Use the basket for vegetables, fish fillets, sausages, and even hamburgers. Ensure food is arranged in a single layer for optimal cooking. The basket’s design prevents smaller items from falling onto the drip pan.
Easy to Clean: The basket is often dishwasher safe, simplifying cleanup after a satisfying meal.

Cleaning and Maintenance
Effortless upkeep is key! The interior wipes clean, while the glass door and drip pan are dishwasher safe for convenient cleaning.
Simple Clean-Up Procedures
Maintaining your Ronco Showtime Rotisserie is remarkably easy! After each use, allow the unit to cool completely before beginning. Wipe down the interior surfaces with a damp cloth to remove grease and food particles. For stubborn residue, a mild dish soap solution can be used, ensuring thorough rinsing afterward.
The removable glass door and drip pan offer even greater convenience. These components are dishwasher safe, simplifying the cleaning process significantly. Regularly emptying the drip pan prevents overflow and ensures optimal performance. Remember to always disconnect the rotisserie from the power source before cleaning.
Dishwasher Safe Components
The Ronco Showtime Rotisserie is designed with convenience in mind, featuring several dishwasher-safe components for effortless cleaning. Specifically, the removable glass door and the drip pan are both suitable for cleaning in your dishwasher. This eliminates the need for laborious hand-washing, saving you valuable time and effort.
Before placing these parts in the dishwasher, remove any large food debris. Use a mild detergent and avoid abrasive cleaners, which could potentially damage the surfaces. Ensure the components are securely placed to prevent movement during the wash cycle. This feature contributes to the overall ease of maintenance.
Exterior Cleaning and Care
Maintaining the exterior of your Ronco Showtime Rotisserie is simple and ensures its longevity. Regularly wipe down the exterior surfaces with a soft, damp cloth. Avoid using abrasive cleaners or scouring pads, as these can scratch or damage the finish; For stubborn stains or grease splatters, a mild dish soap solution can be used, followed by a clean water rinse.
Pay particular attention to the control panel, ensuring no moisture enters the buttons or switches. Dry the exterior thoroughly after cleaning. Consistent care will keep your rotisserie looking its best and functioning optimally for years to come.

Troubleshooting Common Issues
Facing problems? This section addresses typical issues like a non-rotating rotisserie, uneven cooking, and temperature control malfunctions, offering solutions.
Rotisserie Not Rotating
Problem: If your Ronco Showtime Rotisserie isn’t rotating, first ensure the unit is properly powered on and the controls are engaged. Check the spit rod assembly; confirm it’s correctly seated in the drive socket and the gear wheel is securely attached.
Solution: Verify the food isn’t overloaded or unevenly distributed on the spit, as this can strain the motor. Inspect the motor itself for any visible damage or obstructions. A faulty motor or a disconnected drive component may require replacement. Refer to the parts section for assistance in locating replacements.
Caution: Never attempt to force rotation manually, as this could damage the mechanism.
Uneven Cooking Problems
Issue: Experiencing unevenly cooked food with your Ronco Showtime Rotisserie? This often stems from inconsistent heat distribution or improper food placement. Ensure the drip pan is correctly positioned to catch drippings and prevent flare-ups that can create hot spots.
Troubleshooting: Rotate the food during cooking, especially larger items, to promote even browning. Verify the heating elements are functioning correctly and aren’t obstructed. Avoid overcrowding the basket or spit, allowing for proper air circulation.
Tip: Marinating and seasoning evenly also contributes to consistent results.
Temperature Control Issues
Problem: If your Ronco Showtime Rotisserie isn’t maintaining the set temperature, several factors could be at play. First, confirm the unit is plugged directly into a functioning outlet, avoiding extension cords. Check for any obstructions blocking the vents, hindering proper heat circulation.
Diagnosis: Observe if the heating elements cycle on and off as expected. If they remain constantly on or off, the thermostat may be faulty. Ensure the door is securely closed; an improper seal impacts temperature regulation.
Caution: Never attempt to repair the thermostat yourself; contact qualified service personnel.

Replacement Parts and Accessories
Find essential replacements! Drip pans, trays, spit rod assemblies, and briquette grates are available online and through retailers for your Ronco Showtime.
Finding Replacement Drip Pans and Trays
Locating replacement drip pans and trays for your Ronco Showtime Rotisserie is crucial for maintaining optimal cooking performance and easy cleanup. These components collect drippings, preventing messes and ensuring flavorful results.
Online marketplaces like Amazon and eBay are excellent resources, offering both original Ronco parts and compatible alternatives for models 3000, 4000, 5000, and 6000. When searching, specify your model number for accurate results.
Be sure to check dimensions and compatibility before purchasing. Some sellers offer complete sets including both the drip pan and grate, while others sell them individually. Regularly replacing these parts ensures hygienic cooking and extends the life of your rotisserie.
Spit Rod Assembly Replacements
Replacing the spit rod assembly is sometimes necessary to restore proper rotation and ensure even cooking within your Ronco Showtime Rotisserie. Over time, wear and tear can affect the gear wheel and rods.
Online retailers, particularly eBay and Amazon, frequently stock replacement assemblies for various Showtime models (3000, 4000, 5000, and 6000). Look for kits that include the spit rods, forks, and the crucial gear wheel.
Ensure the replacement is compatible with your specific model. Non-stick options are available for easier food removal. Carefully follow the assembly instructions in your manual when installing the new spit rod, ensuring secure attachment for safe operation.
Availability of Briquette Grates
Briquette grates offer an alternative cooking method for your Ronco Showtime Rotisserie, allowing for smoky flavors and higher temperatures. While not standard with all models, they are a sought-after accessory.
Finding these grates can require some searching. eBay is a primary source, often listing both new and used options specifically for Ronco rotisseries. Availability fluctuates, so regular checks are recommended.
When purchasing, confirm compatibility with your Showtime series (3000, 4000, 5000, or 6000). Proper grate placement is crucial for safe and effective use, ensuring even heat distribution around the rotating food.
Safety Precautions
Always follow provided warnings, usage guidelines, and electrical safety information. Secure the door with the silicone tie during storage to prevent accidental openings.
Important Safety Warnings
Caution! The Showtime Rotisserie operates at high temperatures. Always use oven mitts when handling hot components, including the spit rod, drip pan, and cooked food. Never touch the interior surfaces during or immediately after operation. Ensure the unit is placed on a stable, heat-resistant surface away from flammable materials.
Electrical Hazard: Do not immerse the rotisserie base in water or other liquids. Always unplug the unit before cleaning or attempting any maintenance. Inspect the power cord regularly for damage and discontinue use if frayed or exposed wires are present. Never operate with a damaged cord. Keep the power cord away from hot surfaces.
Supervision Required: Close supervision is necessary when the appliance is used near children. Do not allow children to operate the rotisserie unsupervised.
Proper Usage Guidelines
Food Preparation: Securely fasten food to the spit rod using the provided food ties. Ensure balanced weight distribution for even cooking. Do not overload the rotisserie; follow recommended weight limits for optimal performance. Utilize the multipurpose basket for smaller items like vegetables or sausages.
Operational Best Practices: Always preheat the rotisserie before adding food. Monitor cooking progress and adjust temperature settings as needed. Avoid opening the door frequently during operation to maintain consistent heat. Use the carving platform to safely remove cooked food.
Post-Cooking: Allow the rotisserie to cool completely before cleaning. Properly dispose of drippings and grease. Store the unit in a clean, dry location.
Electrical Safety Information
Grounding Instructions: This appliance must be grounded for safety. Do not operate with a damaged cord or plug. If the cord is damaged, it must be replaced by a qualified technician.
Voltage Requirements: Ensure your outlet voltage matches the rotisserie’s specifications. Using an incorrect voltage can cause damage or fire. Never use an extension cord unless absolutely necessary, and choose one rated for the appliance’s wattage.
Water & Electricity: Never immerse the rotisserie, cord, or plug in water. Avoid operating near sinks or wet surfaces. Disconnect from the outlet when not in use and before cleaning.

Advanced Techniques
Mastering Flavor: Elevate your cooking with marinades, seasoning rubs, and proper food tie techniques for consistently crispy, delicious results every time.
Marinating and Seasoning Tips
Unlock Flavor Potential: Marinating is key to tender, flavorful results. For chicken, a citrus-herb marinade penetrates deeply, enhancing taste. Dry brining – generously seasoning 24 hours prior – creates incredibly juicy meat.
Spice Blends: Experiment with rubs! Paprika, garlic powder, onion powder, and cayenne pepper create a classic profile. Consider Mediterranean blends for lamb or poultry. Remember to pat the meat dry before applying seasonings for optimal browning.
Injection Marinades: For larger cuts, inject marinade directly into the meat for even distribution of flavor. This is particularly effective for achieving moistness throughout the entire roast.
Achieving Crispy Skin
The Secret to Perfection: Achieving beautifully crispy skin requires a few key techniques. First, ensure the chicken (or other poultry) is thoroughly dry – pat it down with paper towels before seasoning. A dry surface browns much more effectively.
Temperature Control: Start with a higher temperature for the initial 15-20 minutes to kickstart the browning process. Then, reduce the heat to finish cooking through without burning the skin.
Basting Options: Lightly basting with melted butter or oil during the last stages can enhance crispness and add flavor. Avoid excessive basting, which can steam the skin.
Using Food Ties Effectively
Secure Your Roast: Food ties are crucial for keeping your food firmly secured to the spit rod during rotation. Begin by centering the food and using multiple ties – spaced evenly along the length of the roast – to prevent shifting.
Tighten Properly: Ensure the ties are snug, but avoid over-tightening, which could damage the meat. A firm, but not constricting, hold is ideal. The ties should prevent movement during cooking.
Loading the Spit: Utilize the food ties during the initial loading process to maintain stability as you position the food onto the spit rod assembly.

Ronco Showtime Rotisserie History
A Legacy of Innovation: Ronco’s Showtime Rotisserie revolutionized home cooking, evolving from its initial design to modern editions, leaving a lasting impact.
The Evolution of the Showtime Oven
From Humble Beginnings: The Ronco Showtime Rotisserie’s journey began with a vision to simplify home cooking. Initially, it offered a novel approach to roasting, moving beyond traditional oven methods. Over decades, the design underwent significant refinements, adapting to changing consumer needs and technological advancements.
Key Milestones: Early models focused on functionality, while later iterations incorporated features like improved temperature control and enhanced safety mechanisms. The introduction of the multi-purpose basket expanded cooking versatility, allowing users to prepare a wider range of dishes. Modern editions boast features like auto shut-off and silicone door ties, demonstrating Ronco’s commitment to innovation and user convenience.
A Continuing Story: The Showtime Rotisserie remains a popular kitchen appliance, a testament to its enduring appeal and Ronco’s dedication to quality.
Ronco Inventions and Legacy
Beyond the Rotisserie: Ronco, founded by Ron Popeil, wasn’t solely defined by the Showtime Rotisserie. The company pioneered numerous innovative kitchen gadgets, including the Veg-O-Matic and the Pocket Fisherman, becoming synonymous with “as seen on TV” marketing. Popeil’s direct-response advertising revolutionized product sales, connecting directly with consumers.
A Culture of Innovation: Ronco’s legacy lies in its ability to identify everyday problems and offer simple, effective solutions. The Showtime Rotisserie exemplified this, providing a convenient way to cook flavorful, juicy meals. This inventive spirit continues to inspire kitchen appliance design today.
Lasting Impact: Ronco’s inventions left an indelible mark on American culinary culture, simplifying cooking and making it accessible to all.
Modern Editions and Updates
Reviving a Classic: The Ronco Showtime Rotisserie has seen a resurgence with modern editions, retaining the core functionality while incorporating contemporary features. These updates include simplified switch controls and a silicone door tie for secure storage, enhancing user convenience;
Enhanced Features: Modern models often boast larger capacities and improved heating elements for faster, more efficient cooking. The inclusion of a multipurpose basket expands culinary possibilities beyond traditional rotisserie fare, allowing for diverse meal preparation.
Continued Popularity: Despite advancements in kitchen technology, the Showtime Rotisserie remains a beloved appliance, demonstrating its enduring appeal and practical design.